Floor sanding is a process used to remove the top layers of wooden floors. Sanding involves the use of abrasive materials such as paper or sandpaper. If you plan to use floor sanding yourself, you should understand the process before starting. In this article, you will learn how to use a drum sander, a palm sander, and an orbital sander.
Using a drum sander
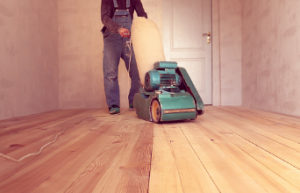 Using a drum sander for floor sanding Adelaide is not as difficult as it seems. However, you need to follow a few rules. Make sure to turn the sander in the opposite direction of the drum’s movement, and remember to replace the sandpaper after completing 250 square feet. It is also important to sweep and vacuum the flooring before sanding. Suppose you are unsure how to use a drum sander; a practice on scrap wood to learn how to use it properly. Start with coarse sandpaper and work your way up to more satisfactory grades.
A drum sander has a higher power rating than a random orbital sander. A standard single-phase floor sander can reach 3900 watts. This machine is quite large and requires a standing position. Its spinning drum holds sandpaper, and you can operate it from a standing position. Make sure to use eye and ear protection when operating a drum sander, as the dust from sanding can cause injury.
Using a palm sander
Using a palm sander for flooring is an excellent idea for small jobs. It can sand tricky corners and edges of a room. The palm sander protects your knees and keeps your floor from being scratched while doing this. In addition, it’s easier to use than an orbital sander. If you want to get the job done fast, you can use a power sander or an orbital sander.
Before sanding your floor, check for nails and screws on the floor. It’s crucial to remove these before starting. Also, remove moulds and stains from walls. Moulds can cause sandpaper to skip edges, so removing them is essential. Wood floor cracks can be repaired by using wood putty. You’ll need to do this step before starting a new floor.
Using an orbital sander
Using an orbital sander for your floor sanding Adelaide job is relatively easy and can save you a lot of money. These machines consist of a drive plate and several individually driven heads. Because they are designed for fine sanding rounds, they do not have the power to remove substantial amounts of damage. Moreover, many people undergoing floor restoration prefer a smooth surface, so they use an orbital sander to get that smooth finish.
Before you start your floor sanding project, it is crucial to remove all curtains and cover them with plastic bags to prevent dust and hair from accumulating. Remember to use an orbital sander on floors at least 0.75 inches thick. You should leave it to the pros if you have a thinner floor. The best way to use this sander for floor sanding is by following these steps.
Using a buffer sander
The buffer sander can come in different shapes and sizes. The RS-16 DC, for example, is a prevalent model because it spins at 175 RPM. It is also a good choice if you want a machine that can remove straight lines on parquet floors. These machines also have a hard plate driver with a felt pad attached. In addition, you can use sandpaper ranging from 12 to 240 grit.
Using a square vibrating sander
Before starting to sand your floors, knowing how long it will take is crucial. If you’re sanding by yourself, sanding a room of 140 square feet can take five hours. But if you’re sanding the entire 600-square-foot room, it will take you multiple days.
Once you’re finished sanding your floor, you’ll want to vacuum it to remove any dust and debris. A vacuum attached to a sander isn’t designed to capture all the dust, so make sure to use a separate vacuum for this task. Afterwards, you’ll want to use a buffer to prepare the floor for sealing. This tool spins a high-speed buffing pad to prepare the floor for the sealer.